Wednesday, December 19, 2012

Christmas Cookie Bake Off: Round 1

Today was the first day of my mom and I's annual Christmas Cookie Bake off; yes, it takes two days. Every year we ask everyone in our family what their favorite cookie is and then we bake them for the holidays. Today, we decided to bake three out of the six treats requested. We made Oatmeal Butterscotch cookies, Peanut Butter Blossoms and Chocolate Gooey Butter Cookies. Yep, you have read it correctly....Chocolate Gooey Butter Cookies. A few years ago my mom was watching Oprah and she featured these cookies courtesy of Paula Deen. We all know if Paula Deen has anything to do with something, it is guaranteed to be delicious. Now, if you love chocolate, melt in your mouth, gooey cookies-these are it! I know around this time of year many people bake holiday treats to give as a homemade gift, for your lovely neighbor, for family, or just for yourself. Therefore, I decided I wanted to share this awesome recipe because it is one that will land a spot in your recipe book for sure. Here is the recipe:

Chocolate Gooey Butter Cookies
(Recipe courtesy Paula Deen)
Makes a little over 2 dozen depending on the size that you make your balls

Ingredient:
1 (8 oz) brick cream cheese at room temperature
1 stick of butter at room temperature
1 egg
1 teaspoon vanilla extract
1 (18 oz) box of moist chocolate cake mix
Confectioners' sugar for dusting

Directions:
Preheat oven to 350 degrees. 

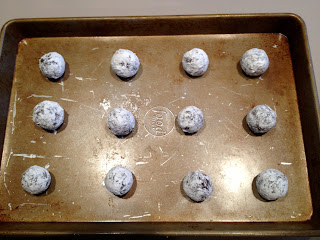
In a large bowl with an electric mixer, cream the cream cheese and butter until it is smooth. Beat in the egg. Once the egg is beat in, add the vanilla extract. Beat in the cake mix. Cover and refrigerate for 2 hours in order for the dough to firm up so you are able to roll the batter into balls. Roll the chilled batter into tablespoon sized balls and then roll them in confectioner's sugar. Place on an ungreased cookie sheet, 2 inches apart. Bake 12 minutes. The cookies will remain soft and gooey. Cool the cookies completely and if desired sprinkle more confectioners' sugar on them. 

I have added two picture, of the the balls rolled in the sugar before baking and one of the finished yumminess :)


Be prepared to be addicted! I would love to hear if you made these yourself or what your favorite cookie is!

I hope everyone has a very happy holiday <3


Sunday, October 7, 2012

Easiest and BEST Ribs EVER!

Lately I have been on a crock pot kick. How easy is it to cook a great meal using a crock pot when you're busy all day? Yesterday I dedcided I was going to make ribs in the crockpot. Cody and I went to a wine tasting last week, which was great by the way, and the wonderful lady who hosted the tasting made these ribs in her crockpot, so I HAD to try them on my own.

These ribs taste and smell so good and the meat falls right off the bone, just what I like! So here is the recipe.

You will need:
 1 Package of McCormick Slow Cookers BBQ Pulled Pork Seasoning Mix
Bonesless pork shoulder roast ( I cut mine into individual ribs)
1/2 Cup of Ketchup
1/2 Cup of Brown Sugar
1/3 Cup of Cider Vinegar ( I only had white vinegar and it tasted just fine :) )

Put the pork in your crock pot. Mix the seasoning mix, ketchup, brown sugar, and vinegar well and pour over pork. 

Cook 8 hours on low or 4 hours on high. 

You can take the ribs out and shred them or you can leave them the way they, which is what we did, and eat them that way.

These are SO yummy and SO easy to make. I will never ever try to make my own recipe again.

If you try these please let me know your thought, I'd love to hear them!

ENJOY and thanks for visiting :)

Friday, October 5, 2012

Crock Pot Applesauce

It's finally the fall season and I am so excited because it is my absolute favorite! Beautiful weather, crisp air, breath taking scenery, and the BEST food. This morning before I headed out to work I figured I would try to make homemade applesauce in the crock pot so that it could cook all day while I was gone. When I walked through the door this afternoon my mouth instantly started watering and my sample taste was delicious-so, I will share my recipe with you all :)

First, I went to my local apple orchard and purchased a huge box of "utility apples". It was 16 dollars for the box but I ended up with well over 100 apples. I figured this was the best bet because I will be peeling my apples anyway when I make applesauce, apple crisp, and apple pie. The box that I got at the orchard was all Macs, there wasn't any other option so I figured I would try them, and it worked out great!

Here's the recipe:

10 large apples, or enough to fill your crock pot 3/4 of the way full
1/2 cup of sugar
1/2 cup of water
Cinnamon

Cook on low for 7-8 hours or high for 4 hours

Once the cook time has been reached, stir around the apples in the crock pot..they should instantly turn to mush. With a large spoon mush around the apples as much as you like or you can use an electric mixer to get the consistency you desire. Once that is finished your applesauce is done. The best part about this recipe is that it can also be frozen! 

I would love to hear your comments if you end up trying this on your own, if you try it and make any changes, and how you like it. Thanks for visiting!

Enjoy :)

Wednesday, September 12, 2012

Rhyme Time

Currently I am in my methods class, which is the course that you take right before you start student teaching. Right now we are in the classroom Tuesdays and Thursdays from 8:00AM-2:00PM learning how to teach ELA and Math to grades 1-6. Recently, we received our placements that are in two elementary schools in the Albany City School District. This week each dyad was assigned an ELA topic in which you had to come up with ways to teach your current placement. My wonderful partner and I came up with many different ideas on how to teach POETRY (our topic) to students in a self-contained classroom. Of course Pinterest has many awesome ideas when it comes to teaching, but teaching poetry is apparently a sore subject ;). I came across an idea that I had to modify a bit to fit our students but thought it turned out pretty good, so, I thought I'd share.

First, this activity is to teach the concept of rhyme to the students. Obviously you would start off with your own introduction along with the definition of rhyme which is, words that follow a repeated pattern. You should also make it clear to your students that words can rhyme even if they are spelled differently.

What you need for this activity:
A rhyming poem
Cookie Sheet
Magnets

To begin, you would choose a poem that has good rhyme within it to revolve your activity around. I chose the poem, "Bear in There" by Shel Silverstein. Here is the poem:

Bear In there
By Shel Silverstein

There's a polar bear
In our Frigidaire—
He likes it 'cause it's cold in there.

With his seat in the meat

And his face in the fish

And his big hairy paws
In the buttery dish,

He's nibbling the noodles,

He's munching the rice,

He's slurping the soda,

He's licking the ice.

And he lets out a roar
If you open the door.

And it gives me a scare

To know he's in there—

That polary bear
In our Fridgitydaire.


I then took 10 words that were within the poem and created a "Rhyme Time" chart. I would introduce this activity and chart as "The Cookie Sheet Challenge". The reason I would do that is because after this activity, as well as other ones within this unit, each student would receive a paper cookie to put in their very own cookie jar if they completed the activity and did a nice job with following directions (similar to a token economy system). Eventually, once students fill their cookie jar they receive a prize for good behavior. The rules regarding this system would have already been addressed before this activity.

Once I created the chart with the words from the poem I also put pictures along with the words. Many of our special needs kids are visual so this is key! I then found words that rhymed with the words that were in the poem and on the chart. For the rhyming words, instead of writing the word and putting a picture with it I just put a picture of the word that rhymes. For example, if the word that was in the poem was bear, I would have the word bear with a picture of a bear on the chart and then the rhyming word that the student has to match with it is JUST a picture of hair. As the students do this activity they will constantly be saying the words out loud to try and find the rhyming picture. Depending on the student, they may have a one-on-one aide who will help them in going through the words, identifying them, and finding the rhymes. Once they match the picture with the correct word that is on the chart the student will then have to write the word of the picture underneath with an expo marker (it erases off because these are laminated). For example, for the picture of hair the will have to write the word hair underneath the picture to the best of their ability.

Here are some pictures of the activity:


Each picture has a magnet underneath it so that they stick to the cookie sheet.


Sunday, September 9, 2012

DIY Kitchen Sink Organizer/Cake Stand

So I have to admit, I am an OCD kinda girl. I like my things nice and organized, clean, and in a spot. Lately, I have been having a problem with all of the hand soaps, dish soaps, and sponges everywhere all over the sink AND leaving nasty rings on the stainless steal sink. Needless to say, I decided to put one of my pins I pinned long ago to use.

This project's goal is to be put along side the sink to hold the hand soap, dish soap, and sponges and leave my sink clutter and "sud ring" free. This project can also easily be used as a cake stand instead of purchasing an expensive one at the store.

What you'll need:

A plate (whatever you choose)
Candlestick holder
Wash clothes
Sharpie
Hot glue gun

TOTAL COST: $10.00


First, flip the plate over and place the candlestick holder (also flipped upside down) and center it on the plate.


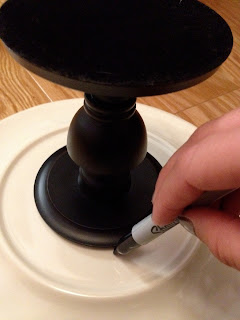
Once it is centered, take a sharpie and trace around the outside of the candle stick.


You will be left with this. 


You then will put hot glue around the circle and quickly place the candlestick holder on top of the hot glue. I also went around the outside of the candlestick holder with hot glue to ensure stability.


Once it is dried you can flip it up and there you have it!


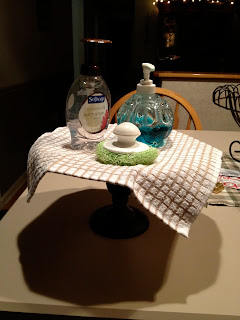
I also bought wash clothes to that match to go on top to keep from having "sud rings" also on my plate since it will be a bit hard to wash it now that it is all put together :)


An example of what it looks like!


If you have any questions or comments please feel free to leave them-I'd love to hear from you!

Sunday, August 26, 2012

Post-It Note Holders

Okay, I know I am nuts..two pinterest projects in a row but I am addicted! As many of you know, I am a Thirty-One consultant (love it) and as patterns come and go I always have left over fabric swatches. Tonight, I decided to try a project out with them. 

I took a 4 x 6 acrylic frame, some ribbon, and some flower embellishments I had laying around and a fabric swatch that has retired. I cut it out to measure 4 x 6 and I hot glued some ribbon to the top of it. I hot glued some flowers on the outside and stuck some post it notes on top and I have a super cute post it note holder for my desk!


This is one I did with scrapbook paper and some string


These are great for gifts..you can attach a pen to it as well. I have lots of fabric swatches and would be willing to make some for you if you would like at $5 a holder. Contact me for pictures of swatches that I have if you are interested!


Cookie Sheet turned into a Magnetic Board

Another Pinterest project! It is a cookie sheet turned into a magnetic board for a kitchen or anywhere in the house! 

What you need:

Any size cookie sheet (needs to be flat) Found mine at Walmart for $8.00 and you get two!
At least a 1/2 yard of fabric (YOUR CHOICE)
Hot glue gun
Ribbon if you would like it
Scissors
Magnets


First Step:
Center the cookie sheet on your fabric and cut your fabric so that you do not have a lot of excess fabric on the sides. This will help when folding the fabric around the cookie sheet tight.


Second Step: Hot glue along the edge


Fold up your fabric and carefully make sure the fabric is secure with the hot glue.


Do the same to the top


On the sides, fold them in as if you were wrapping a present. Where the corners are folded over I put hot glue to hold it together so it would be easier for me to fold.


Put hot glue on the cookie sheet and fold up the sides..once again carefully make sure the fabric is secure with the hot glue.


 Flip it over and there you are!


I created a ribbon and hot glued it to the fabric. The magnets that you see I had laying around ( I didn't make them :) )


Please leave some feedback or ideas on how to use this elsewhere!

Wednesday, August 22, 2012

No Sew Braided Fleece Blanket

The past few days I have been searching around for an easy no sew blanket to make for the spare bedroom in Cody's house since he is starting to furnish it for guests. I have seen the fleece tie blankets and think that they are cute but whilel I was searching Pinterest I found an even better idea. Thank you to Helping Little Hands

Today I went to JoAnn's to purchase a nice fleece pattern and was able to stumble upon a great deal on fleece. I decided that I would want the blanket to be able to be used in Fall, Winter, Spring, and cold Summer nights. Therefore, I was only going to use one piece or fabric rather than two to make it a bit thinner. 

Items needed for project:

-2 yards of fabric
-Cutting mat
-All Purpose Cutting Roller
-Size J crocheting needle

Before anything cut the annoying and ugly edging off of the fabric.


 Second, on each corner of the fabric cut out 2 x 2 squares


I then used masking tape from one end to the other to ensure a straight line and to help with cutting one inch wide, and two inch deep strips.


To cut the one inch strips I laid the fabric (which is folded in half so you can do twice the amount in one sitting) and I using the rotary cutter at every inch mark all the way until the end of the fabric. ONLY cut up to the tape as that is two inches. 

This is a picture of the strips cut every inch.


Once all of the strips have been cut, go through and cut a slit into each strip. This works best by folding the strip at the bottom and cutting a little slit. Having the slit at the bottom of the strips makes a better looking braid.


Here comes the braiding! Take one strip and take the one to the left of it. Take the one to the left and slip it through the slit.


This is the strip to the left pulled through. Now, you can use the J crochet hook or your fingers. I found for myself the fingers were the easiest and fastest and good for fine motor skills :) (sorry, that's the teacher in me)


Now that a strip is through a slit, take the strip that you pulled through and the strip to the left of it and do the same.


Strip #2 pulled through. Now just repeat..


And a line of braiding along the edge!

When you get to the corners do the same thing you've been doing and the corner will wrap around naturally.


Once you come back to where you started and have one strip left you need to cut it in half.


Take one of the "half strips" and pull it through the last strip that was pulled through before you came upon the last strip.


Take the "half strip" that is left on the right side and put it through the slit of the beginning of the braid.


Take the two ends and tie them together to make a knot.


  And you are finished!